The silver is the first thing you see. One stubborn strand at the temple, catching the light from the bathroom like a thread of spider silk in the moonlight. You reach up, pinch it between your thumb and finger, and feel that little jolt of surprise: “When did that get here?” Another morning, and a few more glints. These quiet ribbons of time aren’t doing anything wrong. But you still lean in closer to the mirror, tilt your head, and wonder if you’re ready for this new season or if there’s a softer way to meet it.
The Silent Rebellion in Your Kitchen
A small rebellion is waiting for you between your kettle and your spice rack. Not the harsh, chemical-laden rebellion that comes in shiny boxes at the drugstore, but something softer, more natural, taken straight from the soil, leaves, and seeds of the world. It doesn’t scream “anti-aging” or promise miracles in bright colours. It just gives you colour, the kind that smells like dirt after it rains and feels like having a slow, patient conversation with your own hair.
You don’t need a lab. You don’t need gloves that smell like plastic or that sharp ammonia smell that makes your nose hurt. All you need are two things: one from the bright, spice-scented corners of your pantry and the other from the quiet comfort of your tea shelf. When you mix them together, you get a homemade hair dye that not only covers grey hair, but also seems to gently fold it back into the natural pattern of your hair.

Henna is the first ingredient. It is made from the dried and crushed leaves of the Lawsonia inermis shrub, which is an olive-green powder. Henna alone gives hair a warm copper and auburn colour. The second is black tea, which is dark, rich in tannins, and smells like smoke. They are common, everyday things on their own. They work together to make a kind of kitchen magic that lets you say goodbye to dull grey and hello to something more colourful, alive, and you.
Why Two Ingredients Might Be Enough
Developer strengths, volume numbers, undertones, timings, patch tests, and aftercare serums can all make hair dye feel like a chemistry test you didn’t study for. But at its core, your hair is simple: it’s a living fibre made of keratin, pigment, and a thin outer cuticle. Grey hairs don’t happen because the hair itself gets weaker; they happen because the pigment cells slow down or stop working altogether. This two-ingredient dye simply coats the strands, like ink sinking into paper fibres, instead of flooding them with harsh chemicals that lift, strip, and force colour inside.
Lawsone is a natural pigment that is found in henna. This pigment sticks to the keratin in your hair, covering each strand with a see-through colour. It doesn’t hurry. It doesn’t hurt. It sits there, getting darker and deeper over time. It’s not a mask; it’s more like a tint that works with what you already have. Your current hair colour shows through—browns get richer, reds get deeper, and greys turn into golden copper or soft brown, depending on how dark your base colour is and how strong your tea brew is.
The second ingredient, black tea, is a quiet support. The tannins in it help make the henna darker and more complex, and they also lightly stain grey strands so they blend in better. Black tea is the liquid that activates henna. It acts as a bridge between your hair’s natural colour and henna’s warm tones, guiding you toward softer browns instead of fiery oranges, especially on grey or white hair.
The Mixture’s Simple Magic
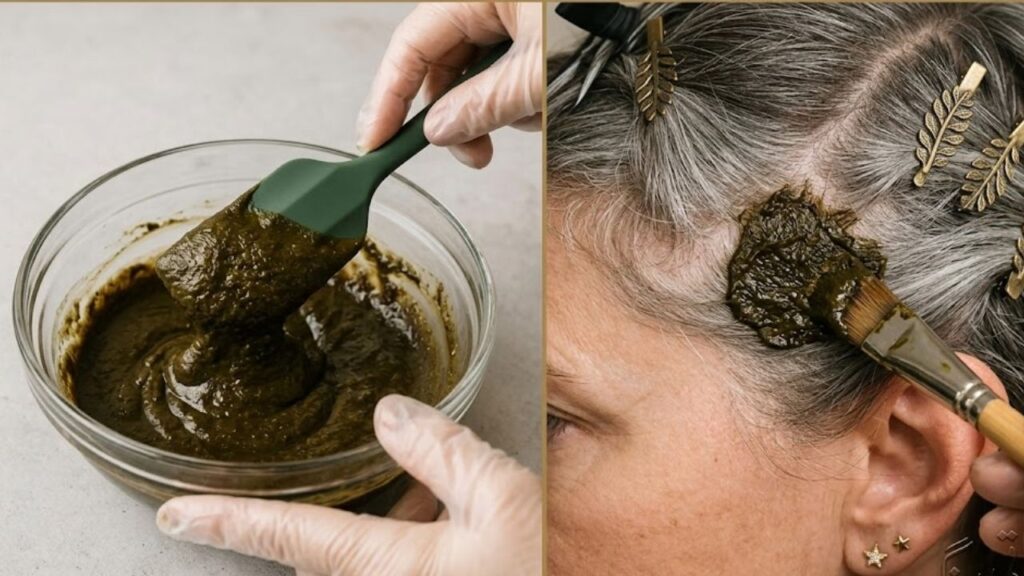
Think of this as a ritual, not a job. A slow afternoon, a hot cup of tea for you, and a different, darker brew for your hair that is cooling on the counter. A bowl that is clean. A spoon made of wood or ceramic. As you pour brewed black tea into henna a little at a time, the soft hiss of the powder hitting the warm liquid makes it thick enough to stick and smooth enough to spread.
Stirring this mixture and watching the colour change from pale green to muddy chestnut is very calming. The smell is earthy, like dried hay and wet leaves, with a hint of the black tea’s warmth. You don’t have to open plastic bags or figure out what chemicals are. You’re making a paste like someone did hundreds of years ago, in a village courtyard or by lantern light.
The recipe looks like this at its most basic:
| Amount of ingredient (short hair) | Amount of ingredient (long hair) | Purpose |
|---|---|---|
| Henna powder (pure, body-art quality) 50–75 g (about 4–6 tbsp) | 100–150 g (about 8–12 tbsp) | gives colour and shine to hair. |
| Strong black tea (cooled) About 120 ml (1/2 cup) | About 240–300 ml (1–1 1/4 cups) | Darkens tone and activates the paste |
The amount of henna and black tea you need will depend on your hair type, density, and length, but the basic idea is the same: mix them together until they form a smooth, thick paste that feels like you could paint with it. No warning labels in tiny red letters or mystery bottles.
How to Make the 2-Ingredient Dye
There’s something nice about turning a normal afternoon into a small, sacred act of self-care. No buzzing salon lights, no cape around your shoulders, and no stylist rushing between clients. Only you, your mirror, and a bowl of brown.
Here’s how it goes:
- Make the tea. Put 2–3 black tea bags (or 2 tablespoons of loose black tea) in a mug or small pot. Add about a cup of boiling water, cover it, and let it sit for at least 10 to 15 minutes, or until it is very strong and dark. Then let it cool down until it’s warm but not hot.
- Combine the henna. Put your henna powder in a bowl that isn’t made of metal. Pour in the warm black tea slowly, stirring it as you go, until the mixture is thick like custard. Not runny, smooth. It won’t drip down your neck because it’s thick, but it’s also soft enough to slide through your hair.
- Let the paste sit for a while (this is not necessary, but it is nice). Put a loose lid on the bowl and let the mixture sit at room temperature for 30 minutes to a few hours. This time for rest lets the dye molecules come out more completely. It may get a little darker as it sits, which is a good sign.
- Get your hair ready. Your hair should be clean, dry, or slightly damp, and it shouldn’t have any oils, serums, or heavy conditioners on it that could coat your strands and keep the dye from getting to them. Use a comb to get rid of knots. Put an old towel around your shoulders or wear a shirt you don’t mind getting dirty.
- Put the dye on. Use your fingers or a tinting brush to apply the paste from the roots to the ends, working in sections. Pay special attention to grey areas like the temples, hairline, and part. As you go, gently massage the mixture into each strand. It will feel cool and a little gritty, like putting your hands in wet dirt.
- Wrap it up and wait. If your hair is long, twist it into a loose bun and cover your head with a shower cap or plastic wrap. This keeps the heat and moisture in, which helps the colour grow. Put a towel over the top to keep it warm. Then you should wait for at least 1.5 to 3 hours. Put on some tea. Read. Let the magic happen slowly.
- Don’t rush; rinse. When you run out of patience or reach the time you set for yourself, get in the shower and rinse off well with warm water. Don’t wash your hair right away. Rub your scalp and hair until the water is mostly clear. A light conditioner can help you get rid of the rough spots. The colour will get darker over the next 24 to 48 hours as it oxidises, and it will eventually settle into its true shade.
How It Really Feels to Let Nature Change the Colour of Your Hair
Chemical dyes often promise perfect results right away, with swatches on a box, straight rows of colour, and a planned result. Natural dyes are more like wildflowers: they are predictable within a range, but they always have a hint of individuality. You might be surprised when you rinse the henna-tea paste out of your hair for the first time. Those sharp, shiny grey strands are now softer and have warm glints of copper or brown that blend in with your natural base like sunlight shining through branches.
Once your hair is dry, run your fingers through it. It often feels thicker, like each strand has a little shield of colour around it. Henna coats, strengthens, and adds weight. The greys don’t yell for attention anymore. Instead, they joined the chorus. They are still unique and still catch the light, but in a soft way instead of a harsh way.
The mirror doesn’t show you a stranger or a version of you that looks like an ad. It shows someone who has made a choice: not to erase time, but to make it easier. Not to act like you’re not there, but to be there. Your hair doesn’t look “done.” It looks like it’s alive.
The Beauty of Colour That Isn’t Perfect
A lot of people only learn this after years of dyeing their hair: hair doesn’t like extremes. It can get brittle, porous, and unpredictable after being bleached, dyed, and re-toned. Each new round of colour tries to fix the damage from the last one, like painting over a wall with crumbling plaster.

This dye with only two ingredients works the other way. It takes your starting point and builds on it. You can’t make dark brown hair blonde. Your jet black hair won’t suddenly turn chestnut. But grey hair, especially strands that are scattered or streaks that are early on, can turn into soft coppers and browns that look more like “subtle dimension” than “grey takeover.” Henna doesn’t make your hair look like a single block of colour; instead, it leaves it shaded and textured, like bark or autumn leaves.
The effect can be especially pretty outside. The henna tones shine in the sun, picking up on soft reds and golds. When they were in the shade, they read deeper, closer to brown. When you have grey hair, the glint that was meant to be noticed turns into something more like a highlight than a warning flare. You haven’t gotten rid of your grey; you’ve just invited it into a kinder colour story.
Choosing This Path on Purpose
Choosing to make your own hair dye with just two ingredients isn’t just about being afraid of chemicals. It’s all about the goal. You should stand in your kitchen and think about how your hair and the body it grows from deserve to be slow, gentle, and curious. You give up the clean, quick salon appointment for something more personal and quiet. You give up results that are predictable but harsh for a shade that changes and grows with you.
You also have the soft realisation that you don’t really hate your grey. You might not like how quickly it came or the cultural meanings that go with it, but the strands themselves? They are just lighter threads mixed in with darker ones. This two-ingredient dye lets you rewrite the story by mixing them together instead of getting rid of them. You’re not “hiding” your age; you’re styling it. You’re messing with it. You’re giving it a place on the palette without giving it the whole canvas.
Small Things That Matter a Lot
Of course, even something as simple as a two-ingredient hair dye has its own set of details—small changes that let you change the colour to your liking.
- Want a darker result? Make your black tea stronger, or wait longer after mixing the henna before putting it on. Doing the same thing every few weeks also deepens the tone over time as more layers of colour build up.
- Are you worried about too much red? Mixing henna with very strong black tea that has cooled completely helps the colour get closer to brown. Using it more than once also tends to make grey hair less bright at first.
- First, test. If you’re nervous, cut a small piece of hair from a place that isn’t very noticeable, or put the paste on a part of your hair that isn’t very noticeable and rinse it out after a few hours. Over the next day or two, pay attention to how the colour changes.
- Take care of your skin. Natural colour can stain, just like box dye. A thin layer of oil or balm on your hairline and ears will protect them. Henna on your skin will usually fade in a few days.
- Another nice thing about this two-ingredient method is that it doesn’t leave a stinky smell in the bathroom, a burning scalp, or brittle ends afterward. Instead, you get hair that often feels stronger, shinier, and more likely to fall into soft waves or hold a curl.
How to Live with Your New Colour
Your henna-tea colour doesn’t “grow out” with a harsh, visible line over the next few weeks. Instead, it slowly fades and gets softer. There are new grey strands at the roots, but the regrowth doesn’t seem as shocking because the colour was never flat or one colour. When you’re ready, you make another pot of tea, get out the henna, and spend another slow afternoon taking care of your hair.
This turns into more of a rhythm than a treatment. A small, regular promise to yourself: I can choose how I see myself. I can use nature—not in a romantic or distant way, but in a real way, like with leaves and tea—to make the difference between who I was at twenty and who I am now less obvious.
And some mornings, you might not only put up with those shiny strands, but you might even like them. You will know that your original grey is still there, honest and unapologetic, under the warm brown or copper. Instead of getting rid of it, you have woven it into something new.
Questions that come up a lot
Will this dye with only two ingredients get rid of all the grey in my hair?
It will make grey strands much softer and mix them together, which will often make them look golden, copper, or light brown instead of bright white or silver. The end result is usually a very natural mix, not just one flat, even colour. You might still see some lighter highlights where the grey was strongest, but they will look like planned highlights instead of sharp contrasts.
Is henna safe for all kinds of hair?
Most people think that pure, body-art quality henna is safe for all hair types, even those with wavy, curly, or coily hair. It can really make strands stronger and thicker. If your hair is very dry, damaged, or chemically treated (especially bleached), you should do a strand test first, though. Stay away from products that say “black henna” or have extra chemicals in them. Only use pure henna powder from a trusted source.
Can I still use this if I already dye my hair with chemicals?
Yes, but be careful. Henna can grab differently and make unexpected colours if your hair has been heavily bleached or chemically treated. Do a strand test every time. Henna coats the hair shaft, so some chemical dyes and lighteners may not work the same way on top of it. Talk to a professional before you fully commit to henna if you plan to keep using salon dyes.
How many times can I use this dye?
You can do it again every 4 to 6 weeks, or even sooner if your hair grows very quickly. Many people find that using henna and black tea on their hair regularly makes it feel better and stronger over time because these dyes are less harsh than synthetic ones. Just keep in mind that henna colour builds up in layers, so if you use it more than once, your hair may get darker over time.
Will the colour come out completely?
People think that henna is a permanent stain on the hair shaft, but the colour can fade over time and with washing. Over the course of a few months, you might notice that the brightness of grey hair fades, but the underlying colour stays the same. Of course, new growth at the roots will be your natural colour, so touch-ups are mostly for the roots and fresh grey.
Does it work on hair that is very dark or black?
Henna mixed with black tea won’t lighten very dark or black hair, but it can give it a warm reddish or chestnut sheen that looks great in the sun. Grey hairs in dark hair usually turn into warm copper or light brown highlights, which makes the sharp salt-and-pepper contrast less harsh.
 Gray hair: 5 Expert Hairdresser Steps That Enhance Salt-and-Pepper Hair Without Adding Years
What if I don’t like the colour when it’s done?
Henna can’t be “washed out” like a temporary colour because it sticks to the hair. The colour will fade over time, though, and oil treatments and time will help soften it. If you’re not sure, start with a smaller test area and a shorter time to apply. You can always go deeper or do it again. The important thing is to take it slow, like getting to know a new friend, instead of all at once.
 Cuticle Oil Guide Shows How Daily Use Strengthens Nails and Boosts Healthy Natural Nail Growth