Getting up with full, well-shaped brows without having to use a pencil seems like the best way to save time on beauty. If you do it right at home, the colour of your eyebrows can last for 3 to 6 weeks. The most important thing is to be careful and in control so that your brows look natural and make your face look better instead of too dark or messy. This guide will show you how to safely and neatly colour your eyebrows at home without making a mess in your bathroom.
Why You Should Think About Tinting Your Brows at Home
Tinting your brows at home is more than just easy or avoiding trips to the salon. A single tint kit usually has enough product for several uses, but a professional appointment only covers one session. You get to choose how dark the colour is, how soft the front looks, and what the final shape looks like when you do it yourself. The colour in your hair usually lasts between 3 and 6 weeks, and the small stain on your skin fades after 5 to 7 days. This makes the change happen slowly instead of all at once.
Another good thing about it is how flexible it is. You can change the shade or the timing whenever you change your hair colour or your makeup style changes with the seasons. When you have control over this small detail, your whole face often looks more polished and put-together, even when you don’t wear makeup.
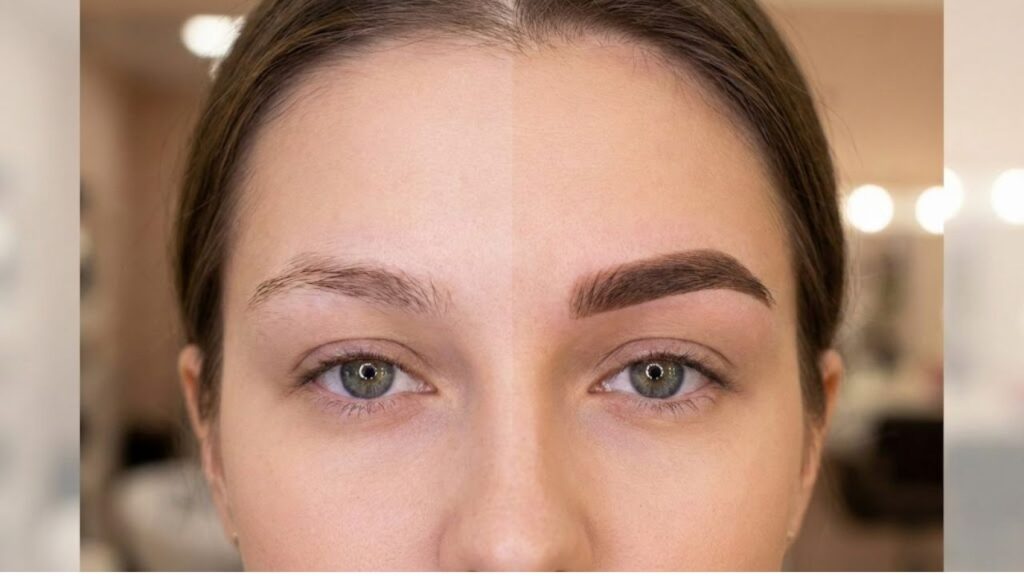
 Awake Look Hack: The Easy Eyebrow Technique Makeup Artists Use to Brighten Faces Within Seconds
How long does brow tint really last?
How long your brow tint lasts depends on your skin type, how you use it every day, and how often you use it. Hair keeps colour for a lot longer than skin does. That’s why brows fade slowly instead of all at once.
Factor
- Gentle cleaning for dry or normal skin: Colour stays for 3 to 6 weeks; stain on skin fades in about a week.
- Skin that is oily, swims a lot, or gets a lot of sun exposure: After 2 to 3 weeks, it starts to fade.
- A lot of oils, balms, or scrubs near the brows: The colour fades faster, especially from the skin.
If you treat your freshly tinted brows gently—less heat, less rubbing, and fewer harsh cleansers—the colour will last longer.
Before You Start, Here’s What You Need
- Ammonia-free brow tint or gel
- A developer or oxidant that the brand suggests, as well as a glass or plastic mixing cup and spatula
- Brow brush with an angle or precision
- Cotton pads and swabs
- Thick cream or petroleum jelly will keep your skin safe.
- A clean spoolie and gloves
- Toner that is gentle or micellar water
- A timer or phone stopwatch is important for safety.
Don’t ever use regular hair dye on your eyebrows. Some dyes can hurt your eyes badly, and PPD (p-phenylenediamine) is one of the ingredients that can cause allergic reactions, especially on sensitive skin on your face.
Why Patch Testing Is Necessary
You should put a small amount of the mixed product behind your ear or on the inside of your elbow before you use any tint. For 48 to 72 hours, don’t cover that area. If you see redness, itching, swelling, or blisters, the dye is not safe for you to use. This easy step keeps you from having reactions near your eyes that are painful and easy to see.
Seven Steps to Get Natural, Salon-Style Brows at Home: Shape Your Brows a Day Before
- Pluck out the hairs that are clearly above and below your eyebrows and in the space between them. When you tweeze, don’t make the shape of your main eyebrow thinner.
- Use a pencil to lightly sketch the shape of the eyebrow you want. After that, use micellar water to clean the whole area and carefully wipe off any extra oil from the skin. This will help the tint go on smoothly and evenly across your brows.
- Put a thin layer of thick cream or petroleum jelly along the pencil line you made. Be sure to keep it away from the hairs on your brow. This barrier keeps stains from happening and helps you get cleaner, sharper edges.
Blend the Tint Well.
Follow the directions on the package to mix 0.5 to 0.75 inches of tint with developer. Most products use the same amount of each ingredient. Mix the ingredients until they are smooth and creamy and there are no lumps left. Choose a colour that is one or two shades darker than the colour of your natural eyebrows. Don’t choose a colour that is too dark compared to the colour of your hair.

Put it on Where Your Brows Are Fullest
Begin at the part of your eyebrow that is closest to your nose. Do small strokes that go in the same direction as your eyebrow hairs grow, and make sure that every hair is completely covered. Move toward the outer end of your eyebrow, but use less product as you go. Make sure your eyebrows are even and not patchy by covering up any light or grey hairs.
Take Your Time and Pay Attention to the Clock
Use the brand’s instructions to set your timer. This usually takes between 7 and 15 minutes. At the 3 to 5 minute mark, you should take a clean spoolie brush and gently comb through the inside of your eyebrow. This makes the front area softer and stops your brows from looking too harsh or blocky.
Gently Take Off and Condition
Set your timer for the time that the brand says to, which is usually between 7 and 15 minutes. After 3 to 5 minutes, you should use a clean spoolie brush to carefully comb through the inside of your eyebrow. This step makes the front look softer and stops your brows from looking too sharp or blocky.
Check in with Natural Light and Start Taking Care of Yourself
Before you check the symmetry in natural light, let the colour set for about an hour. It’s perfectly normal for the two brows to be a little different, and makeup can easily fix that. For the first twenty-four hours after the procedure, keep your brows dry. You should also stay away from products that contain oil and not scrub the area around your appointment for a few days.

Things to Avoid When Tinting Your Brows
- If you don’t do the patch test, your skin could get irritated.
- Choosing a colour that is too dark or warm often makes you look fake and harsh.
- Use gentle wiping motions when removing tint. Scrubbing can irritate the skin and hurt hair follicles.
- If you don’t take care of your tint properly, it will fade quickly when it is exposed to heat, sunlight, or strong cleaning products.
A Little Change That Makes a Big Difference
A good brow tint can really change how you look. Your skin looks better and your eyes stand out more. Your face looks good even when you don’t wear any makeup. You can tint your brows at home and enjoy weeks of easy definition if you prepare properly, use safe products, and take care of your brows afterward. Once you find the right way to do your brows, you’ll realise that it’s an important part of your beauty routine that you can’t live without.